beta
The Do-It-Yourself Transit Info Display (beta) from CTA makes it easy for anyone with some computer savvy to show estimated bus arrival times on a display in a building lobby, a storefront window, inside a shop... Anywhere you like!
It’s essentially a Web-based slideshow with CTA Train Tracker and CTA Bus Tracker arrivals (and more). And the best part is, it's free! You just need to provide the computer.
(Note: This is the latest release of what was formerly the "Do-It-Yourself Bus Tracker Display".)
Read the brochure
Get a quick overview of how this tool works and how it can benefit you in this handy brochure.
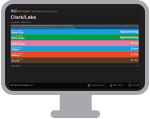
See a sample of how a slideshow looks
We recommended viewing this at 1024x768 resolution. On most computers, you can use F11 to toggle your browser to/from "full screen" mode.
On this page...
The basics
Recommended minimum resources
You’ll probably need a dedicated computer and an always-on Internet connection. You'll also need a display screen dedicated for use.
Tip: You (or someone who is setting this up for you) should have a pretty good understanding of how to set up and configure a computer and computer screen and be prepared to perform periodic maintenance to the display setup and the customized configuration of this application.
Support
Personal support is not available for configuring a computer for use with this application, but we will try to help you with questions you may have about the tool itself and how to get it to show the information you're interested in.
This product is a public beta, which means that it is still a work-in-progress. We’ll be making minor tweaks, feature additions, fixes and improvements as time goes on (you can expect to notice some gradual improvements).
If you suspect you have found a bug, have questions about this Web app or have suggestions on how we can make this product or these instructions better, e-mail webmaster@transitchicago.com with your comments!
License
No guarantees are made regarding the functionality, reliability, or availability of this product, nor is the Chicago Transit Authority (CTA) liable for any damages resulting from the use of this tool. In using this tool, you are bound by our Developer License Agreement & Terms of Use.
How it works
This application is a Web-based slideshow which automatically cycles through estimated arrivals for bus stops and train stations you select, and can show additional information such as Chicago weather. You can select anywhere up to eight slides of bus stop or train arrival information, plus Chicago weather and customer alerts for routes you specify.
How to set up a display
- Designate and set up a player computer.
Any computer with Internet access and just about any modern Web browser can perform the function of displaying this Web-based slideshow. It’s up to you what you use. We recommend a wide-screen display, but any display set at a resolution of 1024x768 or greater will do. Also, be sure to turn off caching.
We’ve tested and confirmed this works on PCs running Windows XP, Vista and 7, Mac OS, Ubuntu Linux, and early test builds of Chrome OS. This application works on most computers, including widely available (and affordable) “netbooks.”
- Use the Online Configuration Tool to form your custom URL.

Easy Configuration Tool
(But please still read all of this page first. There's a lot you should know before you get started.)
- Set up and run the DIY CTA Transit Info Display from a computer.
Use the URL generated by the configuration tool to show it in a browser and let it run! You can create a bookmark or configure a computer to open your slideshow automatically when it starts up.
In any configuration, it’s encouraged you set your browser to run full screen, if available (F11 toggles between full screen mode and a regular window in most browsers on most operating systems). If using Windows, check out Internet Explorer's Kiosk Mode (see below).
Tips and recommendations
Auto-start
Try setting up a dedicated computer that has no other uses, automatically starts up, logs in and loads the DIY Transit Info Display. This will make incidences of needing to restart due to system instability, the installation of system updates or an unexpected power loss easy to recover from—simply restart the computer, and it would then go back to showing train or bus times.
In Windows, try Internet Explorer or Chrome Kiosk Mode
If you’re using Microsoft Windows Internet Explorer and Chrome both have built-in kiosk modes for purposes just like this.
First, you'll need to create a custom shortcut (advanced) in Windows to launch your special URL directly in kiosk mode, which is designed to automatically run full screen. You can then put that shortcut in your Start Menu's "Startup" folder and it'll launch when the computer starts up and gets to the desktop.
In Internet Explorer's, command ("target") add "-k", and in Chrome "--kiosk". In each, you follow that with the full URL of the page to load in quotes, which would be your slideshow's custom URL.
Note that in kiosk mode, no browser or regular window controls appear, even if you move your mouse to the edges of the screen—use ALT+F4 to close the program and get back to your desktop.
Other tips
General
- Consider using a clean install of an operating system with a minimum number of essential programs installed. All you need for the computer is a Web browser, if you’re designating it for only this purpose, which comes automatically built in to most operating systems. Minimizing what's installed will reduce the likelihood of other programs running in the background and potentially causing problems that could disrupt operation of the display.
- Understand that computers require maintenance. Any computer you configure, even for simple tasks, may require the occasional reboot or manual installation of system updates. Before setting out to put up your own public display, understand that you will likely need to perform periodic maintenance, including updating this tool in the event that a bus stop is moved and its ID# changes.
- Disable any caching of content in the browser you choose to use for your display. This makes sure that every time a slide loads, you're getting the latest information from our servers. Cache (sometimes called "temporary Internet files") settings are different for each browser, so check the help in your browser for info.
- Secure the computer. Make sure firewall software, as appropriate, is enabled. Install any operating system updates (including major updates like service packs) and have anti-virus software running and updated. As with any computer, it should be regularly checked to ensure everything is in good order.
- Uninstall or disable any programs you don’t need on the computer, especially programs that might independently open new windows or popup notifications, such as e-mail or instant messaging applications.
- Hide system notifications in programs that might commonly pop up on your screen. These might cover up the display. (And again, be sure to perform regular maintenance—if you hide notifications, you might not be aware of an issue until you manually check things out.)
- Check to see that the clock on the computer is set correctly and automatically configured to synchronize itself with Internet time servers (and, being in Illinois, set to adjust automatically for Daylight Saving Time). The time and date displayed comes from your system clock, not our servers.
- Make sure the computer has a reliable, always-on Internet connection, whether wired or wireless. Always use your own Internet connection (not someone else’s—this can be unreliable, pose security risks and even illegal). Dial-up access for use is not recommended.
- Physically secure any hardware for your installation to prevent theft or tampering. If your chosen display has USB ports built into it, connect only the standard video cable—not any USB cables that activate those ports to ensure nobody else can plug in their own keyboard and take over your computer.
- Disable screen savers and power-saving options so the screen and computer never turn off or go to sleep.
Caution: Many types of displays can suffer from a condition called “image burn-in.” If the exact same images or shapes appear in the same spot on a display, a silhouette of that image can be “burned” into the display, permanently. This is especially common among CRT screens (the not-flat-panel kind with a glass picture tube) and also on some flat-panel plasma screens. It can also happen on LCD panels (most computer screens are LCD), but typically to a lesser degree. Use a display you are comfortable permanently designating for a use like this, and do so at your own risk.
- If a problem occurs, the first thing you should try is simply refreshing the overall slideshow page (F5 in most browsers). If that doesn’t work, try restarting the computer.
Advanced tips
- Since you’ll probably be letting the computer start up and log in automatically and sit in a place you can’t monitor at all times, it should not have any access to personal or shared resources on a network. Also, disable the “remember passwords” feature in the browsers you install or use (passwords are often saved in an insecure fashion on many computers).
- Once you’ve got the system up and running, if you’ve configured it to log in and automatically start this app, consider disconnecting the keyboard and mouse so people don’t come along and interfere with your display. If you have a USB mouse and keyboard, you should be able to easily plug them in and unplug them at any time in the event you need to get onto the computer for maintenance or to make changes.
- Understand our Developer License Agreement (DLA) and that no guarantees about the availability of this service are made, and that CTA reserves the right to change or discontinue this service at any time, without notice. You assume all liability in your use of this product. Go to http://www.transitchicago.com/developers/terms/ to read the full terms.
- If you need more advanced functionality for your purposes, visit http://www.transitchicgo.com/developers/ to learn more about what tools are available to build your own apps. All of the data this tool uses are freely available from the CTA and other sources.
Advanced configuration options
If you like, you can manually form the URL to set up the slideshow:
Base URL: https://www.transitchicago.com/diydisplay/
Configure the tool using a “query string”: Append a question mark to the base URL and then specify any number of parameters, such as “?s1=5518&alerts=56”, using an ampersand as a concatenator.
|
Name
|
Description |
Value
|
Description
|
|
s1, s2, s3, s4, s5, s6, s7, s8
|
Stop IDs, per slide |
integer
|
Specify stop IDs for each slide. The stop IDs you can specify are the same as in our GTFS data.
You can also combine two bus stops into a single slide (e.g., simultaneously show both eastbound and westbound arrivals in the same list) by entering two stop IDs, separated by a comma.
For Train Tracker information, only one station can be specified at a time, and you'll need to use the parent station IDs in the 40000-49999 ID range.
|
|
n1 thru n8
|
Custom location names, per slide |
text
|
Optional; applies to bus slides only. Corresponding custom stop name for each slide (recommended, done automatically by config tool). Must be properly encoded for URL (invalid characters can cause errors). Use + sign in URL for spaces.
|
|
c1 thru c8
|
Custom background colors, per slide |
hexadecimal/HTML color code
|
Optional; applies to bus slides only. Corresponding custom color for each slide. Use hex code only—no preceding hash mark (#).
|
|
alerts
|
Routes to be shown on alerts slide |
comma separated list
|
Optional. If you’d like an additional slide to show alerts for a number of routes, specify each route you want to include in this parameter. Do not use spaces. For example “20,56,Red” would result in an alerts slide that shows active alerts that apply to the 20, the 56, and the Red Line.
|
|
w
|
Show weather? |
binary (0 or 1)
|
Optional. Specifies whether to show a weather slide (default/unspecified = 1)
|
|
partner
|
Partner code |
text
|
Optional. If you’re a CTA partner, use the partner parameter to pass your partner code. The tool will then show your branding.
|
| bn |
Provider name (you or your business) |
text |
Optional. If used, a slide will be inserted that shows "This helpful display brought to you by:" with your name or your business name. Use + sign in URL for spaces. |
| tl |
Provider tagline |
text |
Optional. Tagline or slogan beneath provider name. Use + sign in URL for spaces. |
| bu |
Provider URL |
text |
Optional. Your Web address (not clickable--use an easy-to-remember address). |
| ps |
Preferred stop |
integer |
Optional. Value should be a single stop ID. Use ps in query string to add a slide that shows, in large text, only the next single arrival for a preferred stop. |
Example string: http://www.transitchicago.com/diydisplay/?s1=5518,5502&n1=%2356+Milwaukee+buses+near+here&alerts=56&s2=41160&w=1
Troubleshooting FAQ
Here’s a quick FAQ that may be helpful if you have trouble:
Why am I suddenly getting an error stating that the bus stop ID# wasn’t recognized?
When we relocate bus stops, a new stop ID is assigned and the old stop ID is deactivated. This can occur due to construction work interfering with access to a stop, community requests to move a stop or when we determine that we can provide better service along a route by fine-tuning where buses stop. Most of our 12,000 bus stops stay in the same place for many, many years. If your bus stop has been moved or removed, you’ll need to reconfigure your display to show bus stops that are presently active.
Also, you can't combine bus and train information into a single slide, so if you comma separate stop IDs and use IDs that apply to bus and train for the same slide, you'll receive an error.
How do I get my browser to go “full screen” on my Mac?
Most browsers in Mac OS do not have a built-in full screen feature. If you wish to dedicate a Mac for this purpose, or simply want to test this application on your Mac, you may want to explore browser extensions that can add this functionality to your browser (caveat emptor: as with any software from unknown parties, make sure it comes from a trustworthy source). Most kiosks you see around probably use versions of Windows or Linux distributions, though.
Why does your Web site show more alerts for my routes than what is shown on my display?
If you opted to show customer alerts affecting your preferred bus routes, you’ll only see alerts which became active within the last 10 days, even though long-term alerts may appear on the Web site for longer. This helps keep the limited space on the slide from being filled with alerts that aren’t news to your regular viewers.
I had a blank predictions slide with an error, and it had no headline like most slides have. Why?
If an error occurs and the Bus Tracker API (on which this app is built) doesn’t return any results, the app may not be able to tell what stop you’d requested. We recommend you manually specify each slide name in your custom address. Note that this is automatically done, by default, if you use the configuration tool, so this issue is likely limited to those who have opted for a manual configuration approach.
The display doesn’t look right—how come some things are cut off on my screen?
First, make sure your display resolution is set at 1024 pixels wide by 768 pixels high (1024x768) or greater. Then, make sure your browser window is “full screen” or otherwise takes up as much of the screen as is necessary, to display properly.
If you are running at 1024x768, we recommend you set the application to run at its smallest size. You can do this in the configuration too, or add &size=small to the end of your custom URL to indicate that you’d like things to be shown for use on a small screen.
Why does it say no arrival times are available, when I know service is operating?
CTA Bus Tracker only shows buses that are within 30 minutes, since it’s hard to reliably predict travel times over great periods of time into the future. One example of how this is possible: If service is only scheduled to operate every 20 minutes or more and a bus is significantly delayed due to an unavoidable circumstance, it might fall outside of that window and not be able to be shown.
CTA Train Tracker has a shorter window, but also then will show the next scheduled train if no live predictions are available up until the end of service for the day. This is indicated with a "star" on the slide.
It’s also possible that a temporary error resulted in no results being passed to your display, which should correct itself on the next refresh.
Finally, if buses are rerouted off of their regular route, Bus Tracker isn’t able to tell when or where, precisely, they’ll resume their regular route along the way, causing them to temporarily disappear from Bus Tracker. We encourage you to include an alerts slide for routes near you so your viewers can see any alerts that might affect their service.